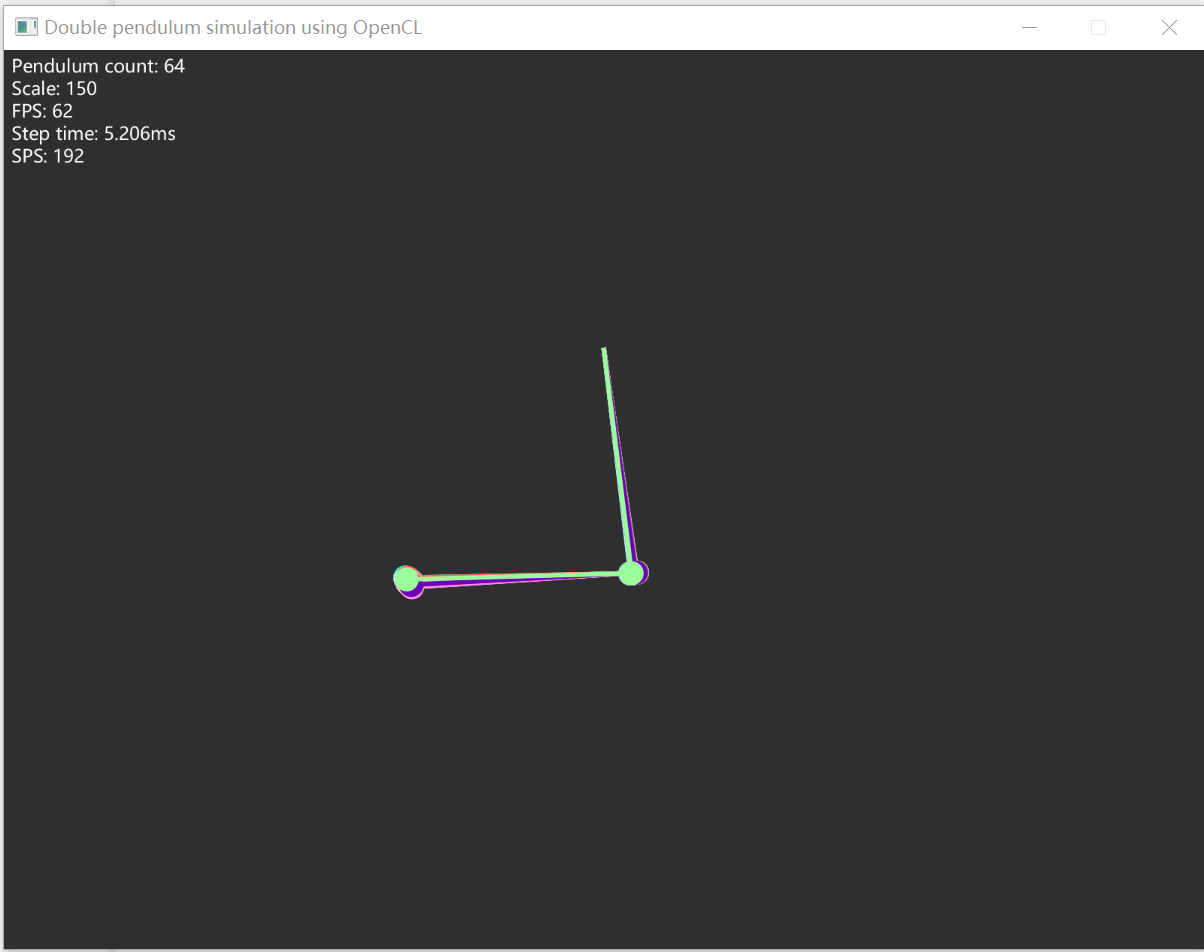
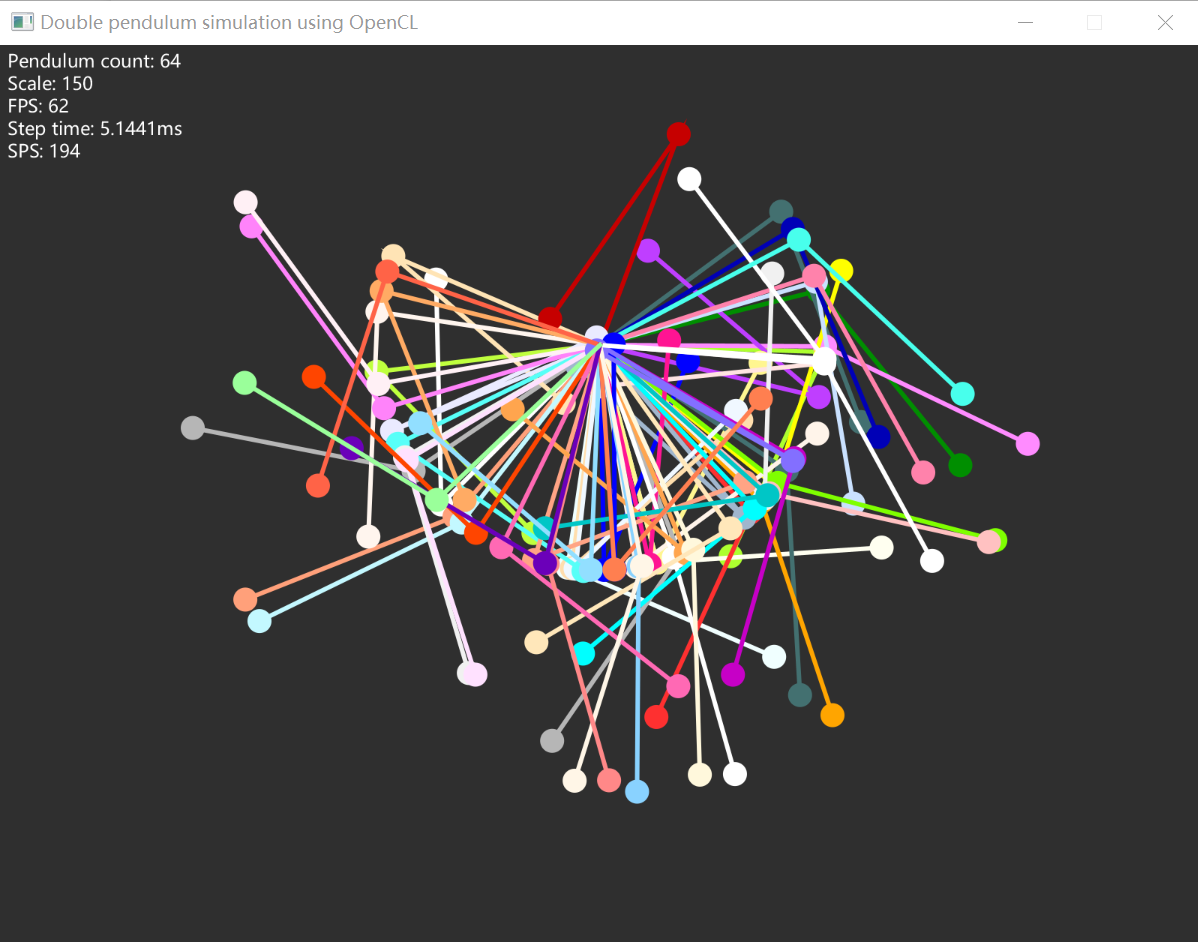
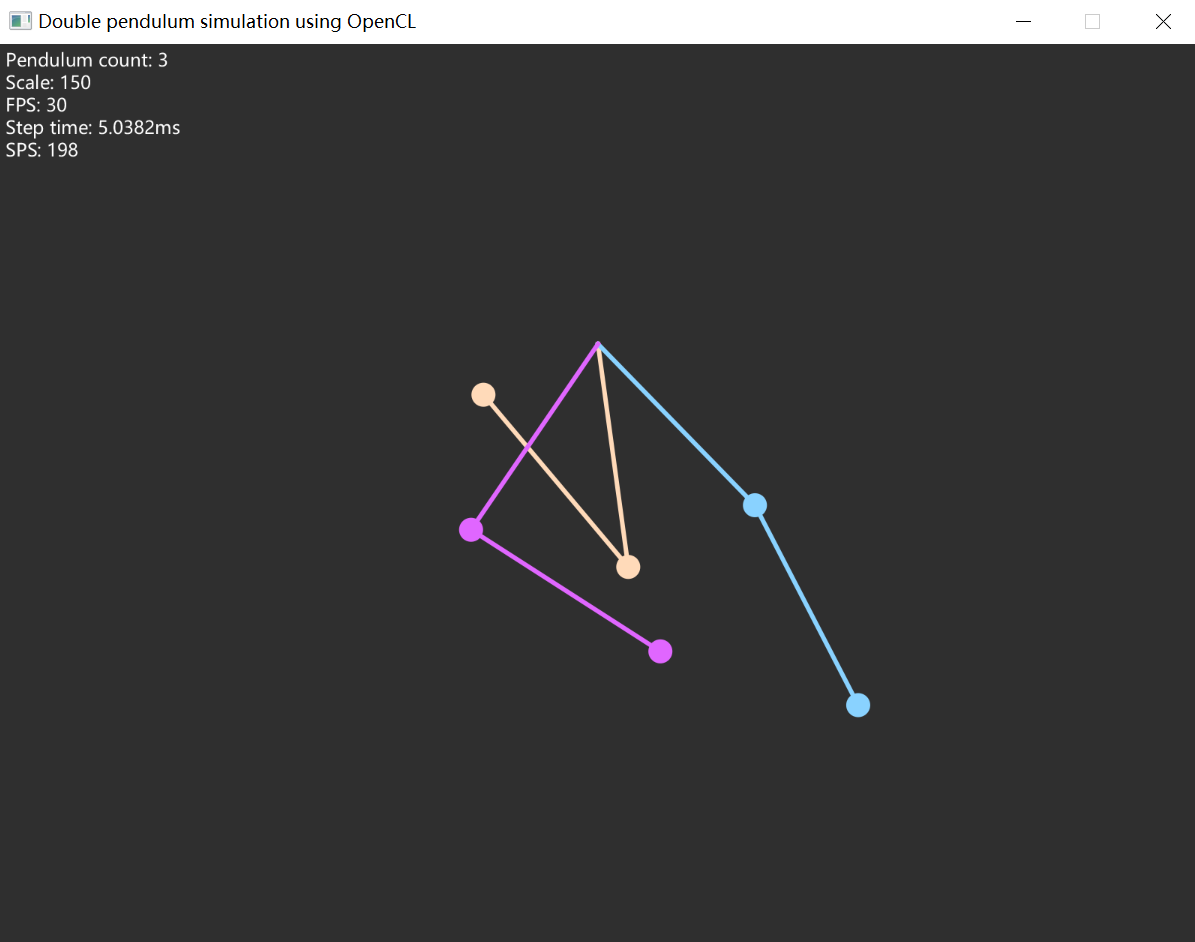
上一篇文章记述了使用LWJGL提供的OpenCL绑定的HelloWorld,之后我尝试使用JOCL重写了代码,获得了翻倍的性能,于是本文使用JOCL模拟双摆。
前言
双摆是将一根单摆连接在另一个单摆的尾部所构成的系统。双摆同时拥有着简单的构造和复杂的行为。双摆的摆动轨迹表现出对于初始状态的极端敏感:两个初始状态差异极小的双摆在一段时间的运行后表现非常不同。本文将编写程序,使用显卡同时计算多个双摆,并将它们叠加渲染在窗口上,以直观的方式体现出双摆对于初始条件的敏感程度。
关于双摆问题的物理描述和数学公式,本文参照这个网页进行实现,值得一提的是本文只注重于数学公式的实现,而非关注数学公式的推导。
多个双摆的计算依赖于OpenCL在显卡的多个计算核心上同时计算。通过编写Kernel,使得显卡上的每一个计算核心在一次计算中计算某一个双摆的物理量变化,多个Kernel同时运行即达到了并行计算的目的。
程序实现
下面我们来说一说程序的整体实现。本文代码目前已经公开到了GitHub Repo中:hurui200320/DoublePendulum。
Kernel编写
下面先来说一说Kernel编写,在明确了每一个计算核心要做的事情之后,Kernel的编写就很容易实现了。
根据参照文献提供个公式,我们可以利用双摆的属性计算出每一个单摆的角加速度。于是Kernel的参数就是双摆的基础属性:
__kernel void pendulum(
    __global float *length1, __global float *length2,
    __global float *mass1,   __global float *mass2,
    __global float *theta1,  __global float *theta2,
    __global float *omega1,  __global float *omega2
)
左侧一列分别对应第一个单摆的轻杆长度、小球质量、当前摆角(竖直向下为0,取逆时针为正方向)和当前角速度(同摆角);类似地,右侧一列表示第二个单摆的。
除了双摆本身的属性参与计算,这里还有两个常量:
#define G $G_CONSTANT$
#define DT $DT_CONSTANT$第一个常量是重力加速度$g$,由于C语言命名规范中常量要全部大写,所以就不得不写成G,所以需要注意的是这个G不是引力常量,而是双摆所在环境的重力加速度。第二个常量用于计算积分的数值解。在参考文献中,他们使用了龙格-库塔法利用计算出来的角加速度计算出对应的速度变化和角度变化,为了图省事儿(就是懒),我是用普通的矩形法来计算,即直接用角加速度乘以一个非常小的$\Delta T$作为角速度的增量,以此更新角速度;角度值类似。
出于灵活性考虑,这里两个常量的值被设定为占位符,目的是能够在程序中读取源程序后进行替换。
内核的具体实现可以移步这里。基本上就是公示的实现,以及利用矩形法更新角速度和角度。
JOCL加载并执行内核
与上文,在使用JOCL之前先要确定要使用的OpenCL设备,与上文中的思路完全一致,这里就不多赘述了,相关的代码在这里。
初始化内核
能够选择出要使用的设备后,可以开始利用JOCL加载并执行内核了。这里将JOCL相关的操作抽象为PendulumSimulator类,这个类在实例化时需要以下参数:
- 双摆的总数
pendulumCount - 局部核心数量
localWorkerNum,这个数量决定了同时在设备中进行计算的核心数,取决于OpenCL设备的不同以及双摆总数的不同,这个值需要用户提供。 - 时间片长度
deltaT,对应前面Kernel的DT - 重力加速度
g,对应Kernel里面的G
对应Kernel中的参数,每个数组在JVM下有三个变量,以第一个参数length1为例,该参数表示第一个单摆的摆长:
    private val pendulumLength1 = FloatArray(pendulumCount)
    private val pendulumLength1Pointer = Pointer.to(pendulumLength1)
    private val pendulumLength1Buffer: cl_mem

// later in init{...}
pendulumLength1Buffer = createClMem()pendulumLength1是Float数组,也是在JVM上实际存储数据的变量。pendulumLength1Pointer是指向该数组的指针表示,用于与JOCL交互,在需要拷贝数据时,需要用Pointer来告诉JOCL把数据放到那里。pendulumLength1Buffer是OpenCL在GPU内存中保存数据的一个对象,在拷贝数据时需要通过指定该变量来告诉OpenCL要放在GPU内存中的哪个地方。
需要注意的是创建cl_mem需要有上下文和命令队列的支持,由于目前还没有开始初始化,所以这个字段要等到之后在初始化环境之后创建。这里createClMem()就是简单的把clCreateBuffer包装了一下,默认创建一个可读可写的GPU内存缓冲区,创建后检查是否出现错误。在没有额外参数的情况下,默认大小为Sizeof.cl_float * pendulumCount个字节。
在数据准备妥当之后,在类的初始化过程中即可完成内核的编译:
init {
    logger.info("Using device: ${clDeviceInfo.deviceName} by ${clDeviceInfo.deviceVendor}")

    // create context
    val contextProperties = cl_context_properties()
    contextProperties.addProperty(CL.CL_CONTEXT_PLATFORM.toLong(), clDeviceInfo.platformId)
    context = CL.clCreateContext(
        contextProperties, 1, arrayOf(clDeviceInfo.deviceId),
        { errInfo, _, _, _ ->
         logger.error("[LWJGL] cl_context_callback\n\tInfo: $errInfo")
        }, null, errCodeRet
    )
    checkCLError(errCodeRet)

    // create command queue
    val commandQueueProperties = cl_queue_properties()
    commandQueue = CL.clCreateCommandQueueWithProperties(
        context, clDeviceInfo.deviceId,
        commandQueueProperties, errCodeRet
    )
    checkCLError(errCodeRet)

    // create cl_mem, GPU memory reference
    pendulumTheta1Buffer = createClMem()
    pendulumTheta2Buffer = createClMem()
    pendulumOmega1Buffer = createClMem()
    pendulumOmega2Buffer = createClMem()
    pendulumLength1Buffer = createClMem()
    pendulumLength2Buffer = createClMem()
    pendulumMass1Buffer = createClMem()
    pendulumMass2Buffer = createClMem()

    // compile program
    // set lengths to null means all string a terminated by \0
    program =
    CL.clCreateProgramWithSource(
        context, 1,
        arrayOf(
            readResourceFileContent("/kernel/pendulum.cl")
            .replace("\$G_CONSTANT\$", String.format("%.6f", g))
            .replace("\$DT_CONSTANT\$", String.format("%.6f", deltaT))
        ),
        null, errCodeRet
    )
    checkCLError(errCodeRet)
    checkCLError(CL.clBuildProgram(program, 1, arrayOf(clDeviceInfo.deviceId), "", null, null))

    // build kernel
    kernel = CL.clCreateKernel(program, "pendulum", errCodeRet)
    checkCLError(errCodeRet)

    // Set the arguments of the kernel
    checkCLError(CL.clSetKernelArg(kernel, 0, Sizeof.cl_mem.toLong(), Pointer.to(pendulumLength1Buffer)))
    checkCLError(CL.clSetKernelArg(kernel, 1, Sizeof.cl_mem.toLong(), Pointer.to(pendulumLength2Buffer)))
    checkCLError(CL.clSetKernelArg(kernel, 2, Sizeof.cl_mem.toLong(), Pointer.to(pendulumMass1Buffer)))
    checkCLError(CL.clSetKernelArg(kernel, 3, Sizeof.cl_mem.toLong(), Pointer.to(pendulumMass2Buffer)))
    checkCLError(CL.clSetKernelArg(kernel, 4, Sizeof.cl_mem.toLong(), Pointer.to(pendulumTheta1Buffer)))
    checkCLError(CL.clSetKernelArg(kernel, 5, Sizeof.cl_mem.toLong(), Pointer.to(pendulumTheta2Buffer)))
    checkCLError(CL.clSetKernelArg(kernel, 6, Sizeof.cl_mem.toLong(), Pointer.to(pendulumOmega1Buffer)))
    checkCLError(CL.clSetKernelArg(kernel, 7, Sizeof.cl_mem.toLong(), Pointer.to(pendulumOmega2Buffer)))
    // init is done
}
传递双摆的初始数据
在内核准备妥当之后,接下来应当设计一些接口,让使用者能够方便的传入或读出双摆的数据:
fun getPendulumPosition(): List<Pair<Double, Double>> {
    val theta1 = pendulumTheta1.toList().map { it.toDouble() }
    val theta2 = pendulumTheta2.toList().map { it.toDouble() }
    return theta1.zip(theta2)
}

fun setPendulumPosition(position: List<Pair<Float, Float>>) {
    require(position.size == pendulumCount)
    position.forEachIndexed { index, pair ->
        pendulumTheta1[index] = pair.first
        pendulumTheta2[index] = pair.second
    }
}以双摆的位置(两个单摆的角度)为例,getter将第一个单摆的角度和第二个单摆的角度以Pair的形式打包后返回,考虑到Java中的实数计算基本以Double为主,故给出的时候也转换为Double给出。读入时为了让使用者知晓计算的精度是Float型,所以读入数据为Pair<Float, Float>,在setter中自动展开。其他数据类似。
在全部数据设置妥当后,需要显示调用来将内存中的数据拷贝给GPU:
fun sendInitData() {
    // theta
    clWriteBuffer(pendulumTheta1Buffer, pendulumTheta1Pointer)
    clWriteBuffer(pendulumTheta2Buffer, pendulumTheta2Pointer)
    // omega
    clWriteBuffer(pendulumOmega1Buffer, pendulumOmega1Pointer)
    clWriteBuffer(pendulumOmega2Buffer, pendulumOmega2Pointer)
    // length
    clWriteBuffer(pendulumLength1Buffer, pendulumLength1Pointer)
    clWriteBuffer(pendulumLength2Buffer, pendulumLength2Pointer)
    // mass
    clWriteBuffer(pendulumMass1Buffer, pendulumMass1Pointer)
    clWriteBuffer(pendulumMass2Buffer, pendulumMass2Pointer)
}其中clWriteBuffer是对clEnqueueWriteBuffer的简单包装,给定GPU内存的Buffer和CPU内存中的Pointer,将数据复制过去并检查错误。
执行计算
由于需要多次执行计算,所以将计算包装成一个同步函数:
private val globalWorkerOffset = longArrayOf(0)
private val globalWorkerCount = longArrayOf(pendulumCount.toLong())
private val localWorkerCount = longArrayOf(localWorkerNum.toLong())

private var oldTime = System.nanoTime()
private var recentTimePerStep = Long.MAX_VALUE

fun getNanosPerStep(): Long {
    return recentTimePerStep
}

fun execute() {
    checkCLError(
        CL.clEnqueueNDRangeKernel(
            commandQueue, kernel, 1,
            globalWorkerOffset, globalWorkerCount, localWorkerCount,
            0, null, null
        )
    )
    // wait all operation is done
    CL.clFinish(commandQueue)
    // update counter
    val currentTime = System.nanoTime()
    recentTimePerStep = currentTime - oldTime
    oldTime = currentTime
}execute函数将开始计算,并等到GPU完成计算后才返回控制权。为了便于调试,在执行阶段加入了时间计算的功能,能够方便的供使用者获知两次计算之间的耗时,用以配合FPS控制模拟的速度。
将运算结果读回CPU内存
每完成一次计算,程序需要将运算结果,主要是双摆的角度(位置)数据读回CPU内存以供其他代码将其渲染到屏幕上。所以单独设计一个函数完成这个功能:
fun syncData(readOmega: Boolean = false) {
    // wait computing is done
    CL.clFinish(commandQueue)
    // read theta
    clReadBuffer(pendulumTheta1Buffer, pendulumTheta1Pointer)
    clReadBuffer(pendulumTheta2Buffer, pendulumTheta2Pointer)
    if (readOmega) {
        // read omega
        clReadBuffer(pendulumOmega1Buffer, pendulumOmega1Pointer)
        clReadBuffer(pendulumOmega2Buffer, pendulumOmega2Pointer)
    }
}在读取数据之前需要等待全部操作完成,以此避免数据不一致的现象发生。默认不读取角速度,但通过传入参数,可以在读取角度数据之后读取角速度。其中clReadBuffer是对clEnqueueReadBuffer的简单包装,将数据从给定的Buffer写到Pointer里,并检查错误。
资源回收
由于JOCL底层还是C语言,如果JVM垃圾回收清理掉了Java中对应的对象,C语言管理的内存还是不会归还给操作系统,久而久之会成为内存泄漏,因此PendulumSimulator类继承了AutoCloseable接口,并有如下实现在关闭时自动回收资源:
override fun close() {
    checkCLError(CL.clFlush(commandQueue))
    checkCLError(CL.clFinish(commandQueue))
    checkCLError(CL.clReleaseKernel(kernel))
    checkCLError(CL.clReleaseProgram(program))
    checkCLError(CL.clReleaseMemObject(pendulumTheta1Buffer))
    checkCLError(CL.clReleaseMemObject(pendulumTheta2Buffer))
    checkCLError(CL.clReleaseMemObject(pendulumOmega1Buffer))
    checkCLError(CL.clReleaseMemObject(pendulumOmega2Buffer))
    checkCLError(CL.clReleaseMemObject(pendulumLength1Buffer))
    checkCLError(CL.clReleaseMemObject(pendulumLength2Buffer))
    checkCLError(CL.clReleaseMemObject(pendulumMass1Buffer))
    checkCLError(CL.clReleaseMemObject(pendulumMass2Buffer))
    checkCLError(CL.clReleaseCommandQueue(commandQueue))
    checkCLError(CL.clReleaseContext(context))
}至此OpenCL的部分全部完成,PendulumSimulator的完整代码可以移步GitHub。
JavaFX渲染画面
为了简单起见,我使用JavaFX的Canvas组件来绘制图形,CPU绘制图形的能力显然不如OpenGL。可是考虑到OpenGL太麻烦了,于是就只好忍耐了。
关于JVM,我使用的是Zulu JDK,这个JDK自带JavaFX,虽然开发时可以通过Gradle解决JavaFX的问题,但运行一些JavaFX开发的程序时会非常方便。
主窗口初始化
主窗口内有如下成员变量:
    private var cpuRenderLimit = 64
    private var scale = 150
    private lateinit var renderChoice: List<Int>
    private val colorList = ColorList(true, Random(System.currentTimeMillis()))
private var lastUpdateTimeMs = System.currentTimeMillis()考虑到CPU往往并不能把显卡计算出来的双摆全都展现在屏幕上,因此在设计上通过选择CPU能够模拟的数量cpuRenderLimit,随机挑选一些双摆进行展示。默认值是64。
另外物理上的摆长以米为单位计算,但屏幕上以像素来计算,所以需要一个缩放来将双摆的摆长缩放到一个合适的屏幕尺寸,默认值是150。
而renderChoice则包含了被随机选中的双摆的索引。colorList是一个存储了各种Color的列表,为此我单独实现了一个类,将在后文详述。lastUpdateTimeMs则用于衡量当前的FPS。
主窗体构造
使用JavaFX构造主窗体,这个窗体简单到只有一个Pane和一个Canvas:
val root = Pane()
val scene = Scene(root, windowWidth, windowHeight)

val canvas = Canvas()
canvas.widthProperty().bind(root.widthProperty())
canvas.heightProperty().bind(root.heightProperty())
root.children.add(canvas)
root.style = "-fx-background-color: #2F2F2F"由于Canvas是透明的,所以为了设置底色,通过设置CSS的方式将Pane的背景颜色设置为#2F2F2F灰。
接下来选取随机选中的双摆索引:
// choose which pendulum we want to render
require(cpuRenderLimit <= pendulumCount) { "Cannot render non-exists pendulum" }
renderChoice = List(pendulumCount) { it }.toList().shuffled().take(cpuRenderLimit)
首先检查数据的合理性,显然CPU选择渲染的数量不能超过双摆总数。然后将所有可能的索引做成列表、随机打散,再取出前n个,就是我们要的列表了。
定时刷新Canvas
既然要渲染,那肯定得定时刷新Canvas。好在JavaFX为我们提供了一个方便的AnimationTimer,但是这个定时器的帧率控制没有什么好的办法,最快我这边测试是60FPS,可能是根据屏幕同步的,由于切换到240FPS需要重启到BIOS里切换显卡,太麻烦了我就没测,姑且认为它是锁60帧吧。
定时器如下:
val timer = object : AnimationTimer() {
    private val nodeRadius = 8.0
    private val lineWidth = 3.0
    override fun handle(now: Long) {
        // read data from GPU
        pendulumSimulator.syncData()
        val position = pendulumSimulator.getPendulumPosition()
        val length = pendulumSimulator.getPendulumLength()
        val centerX = canvas.width / 2
        // center positioned at top 1/3
        val centerY = canvas.height / 3

        val graphicsContext = canvas.graphicsContext2D
        graphicsContext.clearRect(0.0, 0.0, canvas.width, canvas.height)
        // reader pendulums
        for (i in renderChoice.indices) {
            val x1 = centerX + scale * length[i].first * sin(position[i].first)
            val y1 = centerY + scale * length[i].first * cos(position[i].first)

            val x2 = x1 + scale * length[i].second * sin(position[i].second)
            val y2 = y1 + scale * length[i].second * cos(position[i].second)

            graphicsContext.stroke = colorList[i].brighter()
            graphicsContext.lineWidth = lineWidth
            graphicsContext.beginPath()
            graphicsContext.moveTo(centerX, centerY)
            graphicsContext.lineTo(x1, y1)
            graphicsContext.lineTo(x2, y2)
            graphicsContext.stroke()
            graphicsContext.fill = colorList[i].brighter()
            graphicsContext.fillOval(x1 - nodeRadius, y1 - nodeRadius, 2 * nodeRadius, 2 * nodeRadius)
            graphicsContext.fillOval(x2 - nodeRadius, y2 - nodeRadius, 2 * nodeRadius, 2 * nodeRadius)
        }
        // render some status
        graphicsContext.fill = Color.WHITE
        graphicsContext.fillText(
            "Pendulum count: $cpuRenderLimit${if (cpuRenderLimit != renderChoice.size) ", click to apply" else ""}",
            5.0, 15.0
        )
        graphicsContext.fillText(
            "Scale: $scale",
            5.0, 30.0
        )
        val currentTime = System.currentTimeMillis()
        graphicsContext.fillText(
            "FPS: ${1000 / (currentTime - lastUpdateTimeMs)}",
            5.0, 45.0
        )
        lastUpdateTimeMs = currentTime
        graphicsContext.fillText(
            "Step time: ${pendulumSimulator.getNanosPerStep() / 1000_000.0}ms",
            5.0, 60.0
        )
        graphicsContext.fillText(
            "SPS: ${1_000_000_000 / pendulumSimulator.getNanosPerStep()}",
            5.0, 75.0
        )
    }
}首先从GPU中将数据读出来,调用我们准备的pendulumSimulator.syncData()函数即可。然后将长度和位置取出来,计算第一个单摆的中心点。由于双摆的主要移动区域在屏幕下半边,所以我这里Y轴的中心点选取屏幕上三分之一的地方,而不是正中间,这样看起来会舒服一些。之后就是拿着Canvas的GraphicsContext绘图了。
首先就是清空整个旧的画面,然后在循环中依次渲染我们选定的双摆。根据三角函数很容易算出第一个单摆的位置,然后在此基础上计算出第二个单摆的位置。每个单摆的摆球半径姑且定义为8个像素(nodeRadius)。
画完之后再写一些调试信息,诸如当前画面中的双摆数量,缩放程度,OpenCL模拟的性能(StepPerSecond和每一步用时),以及当前窗体的刷新率等。
最后别忘了启动这个定时器:
timer.start()交互
只是死板的显示预先选定的双摆多少有些没有意思,所以我决定加一些交互功能:
- 鼠标左键单击可以重新随机选取要渲染的双摆索引
- 使用鼠标滚轮可以改变渲染数量
- 按住Shift再使用鼠标滚轮可以改变缩放级别
于是有如下代码:
primaryStage.scene = scene
primaryStage.title = "Double pendulum simulation using OpenCL"
primaryStage.isResizable = false

primaryStage.setOnCloseRequest {
    logger.info("Application shutdown")
    timer.stop()
    shutdownFlag.set(true)
}

// Left click to re-chosen pendulums
canvas.onMouseClicked = EventHandler { event ->
    if (event.button == MouseButton.PRIMARY) {
        renderChoice = List(pendulumCount) { it }.toList().shuffled().take(cpuRenderLimit)
        colorList.reset()
        }
}

// scroll to change pendulum count and rod scale
canvas.onScroll = EventHandler {
    cpuRenderLimit = when {
        it.deltaY > 0 -> { min(cpuRenderLimit + 1, Int.MAX_VALUE) }
        it.deltaY < 0 -> { max(1, cpuRenderLimit - 1) }
        else -> { cpuRenderLimit }
    }
    scale = when {
        it.deltaX > 0 -> { min(scale + 1, Int.MAX_VALUE) }
        it.deltaX < 0 -> { max(1, scale - 1) }
        else -> { scale }
    }
}

primaryStage.show()首先是设定窗体的标题等,这里禁用了窗体缩放。然后设置了窗体关闭时进行的操作,主要是停止前面的定时器,然后通知主线程窗体已经关闭(通过信号量shutdownFlag)。
接下来就是鼠标左键重选索引的代码,在之后是监听OnScroll事件,如果是Y方向上的滚动,就是对渲染数量的调整,如果是X方向的滚动,就是对缩放的调整。
最后显示主窗口。
主窗口的完整代码可以移步GitHub。
ColorList
前面说为了实现每一个显示的双摆都有一个独一无二的颜色,于是实现了这个类。
在JavaFX的Color类中已经预先定义了一些颜色,但这些颜色只有148个,当需要的颜色超过148个时,就要随机生成一些颜色。
由于Color中没有已定义颜色的列表(JDK11),所以不得已只能把定义的语句复制出来,用常量名组成列表:
private val predefined = mutableListOf(
    Color.ALICEBLUE, Color.ANTIQUEWHITE, // ...
)
除了预定义的颜色,我们还得存储随机生成的颜色:
private val generatedColorTable = HashMap<Int, Color>()
private val uniqueColorSet = HashSet<Color>()其中generatedColorTable记录每个索引对应的颜色,而uniqueColorSet则用来保证后续随机生成的颜色是唯一的。
初始化时需要将预定义的颜色放进这个Set中:
init {
    if (randomized) {
        predefined.shuffle()
    }
    for (color in predefined) {
        uniqueColorSet.add(color)
    }
}
如果有需要,还可以在初始化时将预定义的颜色随机排序。
通过重载get函数,我们可以利用[123]来像数组一样获取颜色数据:
operator fun get(index: Int): Color {
    return when {
        index < predefined.size -> {
            predefined[index]
        }
        else -> {
            generatedColorTable[index] ?: generateRandomColor(random).also {
                generatedColorTable[index] = it
            }
        }
    }
}
如果索引小于预定义的颜色数量,则从预定义的颜色表中取颜色,如果没有,则从随机生成的颜色表中取,如果这个索引还没有颜色,就随机生成一个并放到生成表里。生成颜色代码如下:
private fun generateRandomColor(random: Random): Color {
var color: Color
do {
color = Color.rgb(random.nextInt(0, 256), random.nextInt(0, 256), random.nextInt(0, 256))
} while (uniqueColorSet.contains(color))
uniqueColorSet.add(color)
return color
}
有时候我们想给每个双摆换一个颜色,那么就通过这个函数来实现:
fun reset(){
    if (randomized) {
        predefined.shuffle()
    }
    uniqueColorSet.clear()
    for (color in predefined) {
        uniqueColorSet.add(color)
    }
    generatedColorTable.clear()
}这个类的完整代码可以在这里找到。
主函数
现在程序的每一个组件都已经准备完毕,于是可以在主程序中将他们串起来了。
主函数位于Main.kt,文件中定义了一些常量,需要使用者按照运行的硬件和自己的需求自行修改:
const val pendulumCount = 81920
const val localWorkerNum = 512
const val windowWidth = 800.0
const val windowHeight = 600.0
const val targetSPS = 200这里定义了双摆的总数、局部核心数量、窗口的尺寸和模拟的目标StepPerSecond。最后一个参数越大,模拟的精确度越高,但是受制于Java的实现,通过Thread.sleep只能达到1ms精度的时间控制,当targetSPS超过1000时,每一步占用的时间小于1ms,如果用while循环硬等,感觉不太环保。于是要求targetSPS不能超过1000。另外通过targetSPS可以算出每一步的deltaT:1.0 / targetSPS
在主函数中会创建双摆的初始数据:
// rod length of each double pendulum
pendulumSimulator.setPendulumLength(Array(pendulumCount) { Pair(1.0f, 1.0f) }.toList())
// mass of each double pendulum
pendulumSimulator.setPendulumMass(Array(pendulumCount) { Pair(2.0f, 2.0f) }.toList())
// initial position
pendulumSimulator.setPendulumPosition(Array(pendulumCount) {
    Pair(
        PI.toFloat() / 2 + Random.nextDouble(-0.05, 0.05).toFloat(),
        PI.toFloat() + Random.nextDouble(-0.05, 0.05).toFloat()
    )
}.toList())
// initial angular velocity
pendulumSimulator.setPendulumVelocity(Array(pendulumCount) { Pair(0f, 0f) }.toList())这里我选取每一个双摆的两个摆长都是1米,摆球重量2公斤,初始位置形成一个左右翻转的L形,并在此基础上添加0.1弧度(大约0.5度)的随机变化。摆球的初速度则设为0。
随后就可以开始模拟了:
// send data to GPU
pendulumSimulator.sendInitData()
// launch window
Thread { launch(MainWindow::class.java) }.start()
// translate second into ms second
require(targetSPS <= 1000) { "Max time resolution exceeds" }
val targetStepTime = (1000.0 / targetSPS).toLong()
// control SFS
while (!shutdownFlag.get()) {
    val start = System.currentTimeMillis()
    pendulumSimulator.execute()
    while (System.currentTimeMillis() - start < targetStepTime) {
        Thread.sleep(1)
    }
}
pendulumSimulator.close()
主函数还要负责限制SPS,这样才能保证模拟出来的速度是正确的。如果SPS超高,则模拟出来的结果会很鬼畜;如果SPS过低,就会肉眼可见的感觉卡顿。所以这里以1ms为单位控制每一步的用时。
主函数的完整代码在这里。
结果讨论
单从性能来说,我的笔记本RTX3070显卡可以在目标SPS为1000的状态下模拟255000(25万)个双摆,保证大多数时候的SPS都在1000附近。而CPU则比较一般,如前文所说,由于使用CPU渲染,画到256个双摆的时候就已经只有30FPS了,512个双摆只有15FPS,1000个双摆时只有7FPS,同时渲染2500个双摆,直接变成PPT:3FPS。
但是退一步说,谁会一起看2500个双摆啊,那眼睛不都看花了。如果把数量调小一些,这个程序所达到的效果还是挺成功的:


一开始每个双摆的位置都差不多一样,但随着时间的推移,每个双摆之间的差距开始增加,直到后来每个双摆都各不相同。
本文的全部代码已经公开到了GitHub中,所以欢迎大家将工程克隆下来运行体验一下。目前Gradle中已经包含了程序运行的全部依赖,只需要克隆工程后让Gradle准备好依赖,之后便可以无痛运行了。
-全文完-

【代码札记】OpenCL模拟双摆 由 天空 Blond 采用 知识共享 署名 - 非商业性使用 - 相同方式共享 4.0 国际 许可协议进行许可。
本许可协议授权之外的使用权限可以从 https://skyblond.info/about.html 处获得。